
Depth-of-Field with mental ray
Mental ray (from mental images) offers enormous advantages over the standard 3ds Max scanline renderer. Among the advantages is mental ray's own depth-of-field camera effect.
This tutorial will show you how to achieve a depth-of-field (DOF) camera effect. Depth-of-field is always present in traditional photography; besides making a shot more realistic, it is also useful for bringing focus to a particular object in the scene without any background distractions.

Macro photography in which the background is completely blurred out and the foreground object is in focus. Photograph by Luc Viatour.
To use this effect well, you also need to know how DOF works in traditional cameras. Essentially, depth of field is a factor of the focal distance and the camera's aperture. The focal distance is the distance from the lens at which everything is sharp; you usually expect the focal distance to be the same as the subject's distance. The aperture setting is how wide the camera's iris is; the hole that allows light into the camera; the wider the aperture is, the shallower and more pronounced the depth of field will be. Lower f-numbers correspond to wider apertures.

This is the scene I will be demonstrating depth of field with.
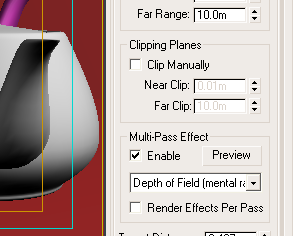
First things first. You need to switch to the mental ray renderer in Render dialog→Assign renderer→Production. Next, you also need to enable the effect for each camera, under Modify→Parameters→Multi-Pass Effect. Choose Depth of Field (mental ray)
instead of regular Depth of Field.
Make note of the f-Stop
parameter.
Take note of how I set my scene up:
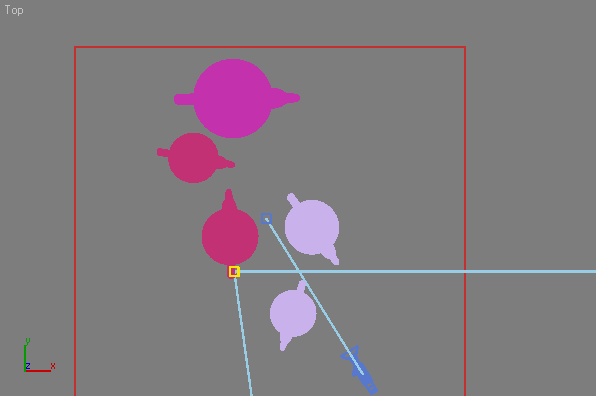
Mental ray uses your camera target as the focal point. This means that anything at the camera's target will be in focus, while anything in front or behind the target will be out of focus. Notice that in my scene, the target is set so that the third teapot from the camera will be in focus. In the following picture, the wireframe plane shows the approximate focal plane of this camera.

Everything behind and in front of that grid will be blurry.
Now that you've set everything up, render the scene. Chances are, the depth-of-field effect is very subtle. You will want to alter the f-Stop parameter in the camera rollout.

My scene with an f-Stop of 1.0.
The f-Stop controls the virtual aperture of the camera. The larger the aperture, the blurrier everything gets. Remember, smaller f-Stop numbers correspond to larger apertures. If you are a photographer, then you will understand immediately. One reminder is that the f-Stop is dependent on the scene's scale. The smaller your scene, the greater the effect will be. That is why macro photography—photography of small objects—usually has a very pronounced depth-of-field effect, while photographs of landscapes have no noticeable effect. When photographing very distant objects, the infinity
setting (&inf;
on the camera) is used.

The left side shows the same scene at 10% scale and the right side shows the same scene at 1,000% scale. Both shots use the same f-Stop of 1.0.
To account for unrealistic scales (you probably forget to use real-world units when making stuff), mental ray allows you to use an f-stop lower than 1.0.

The original scene (at 100% scale) with an f-Stop of 0.5.
Used correctly, the depth-of-field effect can accentuate a scene and bring the viewers' focus exactly where you want. However, computing this effect at render time can be computationally expensive; many people opt to add the depth-of-field effect in at the post-processing stage, using software like Adobe After Effects.

The rare Utah teapot in its natural habitat.