
Mental ray: Caustics
Caustics
is the term or the light patterns caused by light refracting through a glass object. For example, take a clear glass of water and set it out in the sunlight. The bright streaks and patterns you see are caustics.
Beginning with 3ds Max 6, the mental ray renderer is integrated with the program. Unlike the default scanline renderer, mental ray can calculate photos to create Global Illumination (GI) and caustics lighting.
This tutorial mainly focuses on refractive caustics caused by light going through an object. There is also reflective caustics caused light bouncing off of shiny things. Both are set up in the same way.
We will start by making the scene that will create caustics. Here, I used the wineglass model from my Lathe tutorial on top of a plane with a simple Perlin Marble diffuse map.
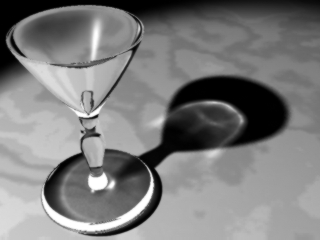
Right now, the scene just looks like this:
First of all, the wineglass isn't even glass yet. To use these photon effects, we need to create a new Raytrace material that's pretty simple:
<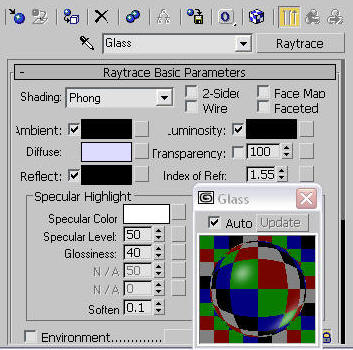
For other scenes, you should probably adjust the Reflect box for reflections, and play around with the Specular highlight. Since this scene is just here to demonstrate the technique, I just made it 100% transparent.
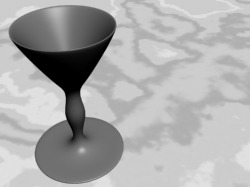
Well, it's glass, but not much else. Now we'll make the caustic generators.
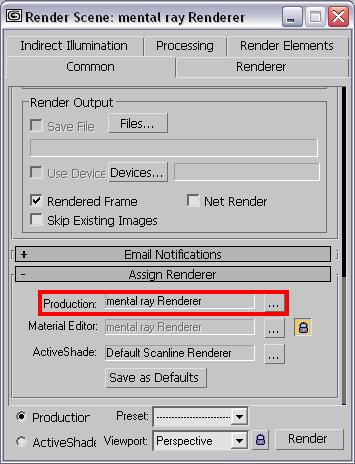
First, we need to change the renderer to Mental Ray (of course). The default Scanline renderer can't do photons.
Now we need to make lights that can emit photons. Go to Create→Light→MR Area Spot and drag in the Left viewport to make a light angled towards the wineglass. It'll render something like this:
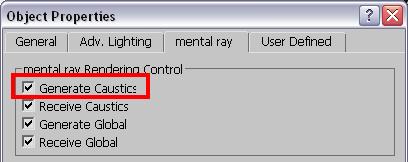
There's another property we need to set before we can have caustics. We need to tell Mental Ray what lights and objects we want to make caustics with. Select the wineglass and the light and right-click. Go into Properties and go to the mental ray tab. Turn on Generate Caustics.
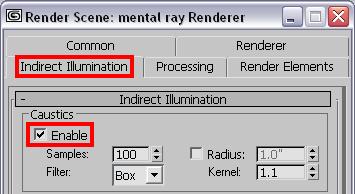
We also need to turn on caustics for the scene itself. Go into the render menu (F10)→Indirect Illumination tab and check Enable for Caustics.
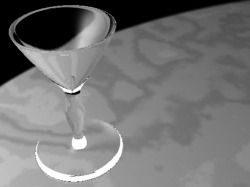
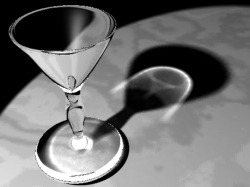
We should now have caustics. Render, and you'll get something like this:
Well, we made caustics, but it could be better. For example, the light is pretty dim, but we can make it brighter. Go into the Inderict Illumination tab of the Render menu again. Scroll to the bottom and find Global Light Properties.
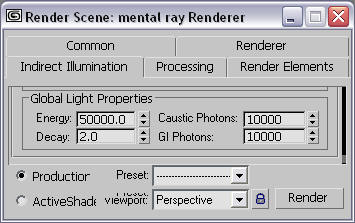
We can simply crank up the energy field. I raised it all the way to to 300,000 and got this:
Hmm. Well, it's bright, but it doesn't look too good because it's spotty. To make it smoother, you can increase the number of Caustic Photons at the cost of rendering speed.
I raised the number of photons to 50,000 and got:
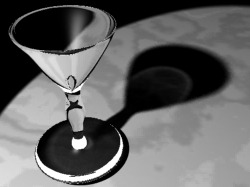
Cool. Now for a couple aesthetic touches. Real glass is never perfectly round and smooth, unlike my NURBS wineglass, so the light patterns shouldn't look so perfect and symmetric. To give it a little natural imperfection, I added a Noise map into the glass's Bump Map slot, and then lowered the bump map to 4. This makes the glass bumpy enough to change the light patterns, but not bumpy enough to be otherwise noticeable.

Alternatively, you can trry mental ray's own Glass (physics_phen) material. It can produce some good realistic effects, although it's quite different from the usual Raytrace material.
blog comments powered by Disqus